

TL;DR: Skipping pre-build planning is the fastest route to a web app that is over budget, insecure, and fails at launch. This checklist covers the 9 steps every team must complete before writing code: (1) lock down project goals and scope, (2) choose your tech stack including AI-era tools, (3) design wireframes and prototypes, (4) bake in security from day one, (5) set up your dev environment and CI/CD pipelines, (6) build a testing strategy, (7) plan for performance and scale, (8) prepare infrastructure for launch, and (9) plan post-launch monitoring and maintenance.
Why Skipping the Pre-Build Phase Breaks Web Apps Before They Launch
Most web application failures are not due to the code quality. Their existence is due to a lack of decisions or to delayed decisions. Some of the most common issues that can occur when teams fail to follow a solid pre-build plan include scope creep, misaligned stakeholders, insecure architectures, and end-of-cycle testing.
The time for making architecture decisions, user requirements, security models, and workflows is PRE-BUILD. If you don't do it, it doesn't save time; it costs time at a steep price.
In the absence of teams planning at the beginning of the build:
- Goals are never formally defined, so scope expands unchecked throughout the sprint.
- A wrong tech stack choice locks your team into a costly six-month migration.
- Security features like authentication and encryption get retrofitted late, opening vulnerability windows.
- CI/CD pipelines and workflows are configured inconsistently across developers.
- QA planning starts too late, resulting in poor test coverage and regression failures at launch.
Step 1: Lock Down Project Goals and Scope Before You Touch the Stack
Before a single line of code is written, your team needs absolute alignment on three things: what success looks like, who the app serves, and what the minimum viable version actually includes.
Define Goals, KPIs, and Project Success Metrics
If you're launching a web application, you need measurable goals before you get started. Without documented goals, stakeholders begin to head off in diverse directions, and developers begin to develop features that don't affect the needle.
Once you're ready to launch the new app, you should ask yourself a few questions: What is the problem that the new app can solve? What will be your targets to accomplish? What will success in 90 days be like?
Turn these answers into real KPIs, like the loading time of pages based on Google PageSpeed, API response time, conversions, or user activation rate. Once agreed, document all KPIs in a central location Google Drive or a Kanban board so every team member can reference them throughout the AI SDLC.
Understand Users, Requirements, and MVP Scope
Building too much without validations is the worst-case scenario in web application development choosing scope early in the MVP process is exactly what prevents it.
Step 2: Choose Your Tech Stack Including AI-Era Considerations
The decision regarding week one will impact what is able to be accomplished in weeks two and three. Pick the solution that is best suited for your team's capabilities, scaling needs, and the growing need for AI integration.
Choose the Right Frontend and Backend Technologies
Your frontend framework choice directly determines rendering strategy, component architecture, and performance characteristics. React suits large, complex applications with dynamic UIs; Vue works well for teams wanting a gentler learning curve; Angular fits enterprise-scale apps requiring strict structure. Each decision has downstream consequences for your CI/CD pipeline, testing setup, and long-term maintenance overhead. At the same time, there are advantages and disadvantages and compromises with regard to the ecosystem maturity, concurrency, and developer availability of the backend languages: Node.js, Python, and Go.
Try to use SSR for SEO and performance, and use CSR for your app. If it requires some sort of offline mode, it may actually be a Progressive Web Application (PWA) and service workers.
Plan Database Architecture and Third-Party Integrations
Choose your database based on data shape, scale needs, and operational overhead the table below maps each consideration to the right option:
One of the biggest reasons for security issues and delays when it comes to products in space is the third-party APIs that have to be implemented at the beginning.
AI Tooling, LLM Integrations, and Automation-Readiness
Today, with modern applications developed for the web, decisions made by AI are at the stack level. AI-native tools like Claude and Relevance AI can be embedded directly into the development process Claude for code generation and review, Relevance AI for automating workflows both significantly accelerating frontend scaffolding and reducing manual overhead. With an API to Anthropic's Sonnet models, developers can create intelligent features without the need to create their own ML infrastructure.
Discuss your architecture and whether you can use AI tools, such as code review and automated testing generation tools like Testomat.io, with your source code repositories and CI/CD pipelines.
Step 3: Design for the User First Wireframes, Flows, and Prototypes
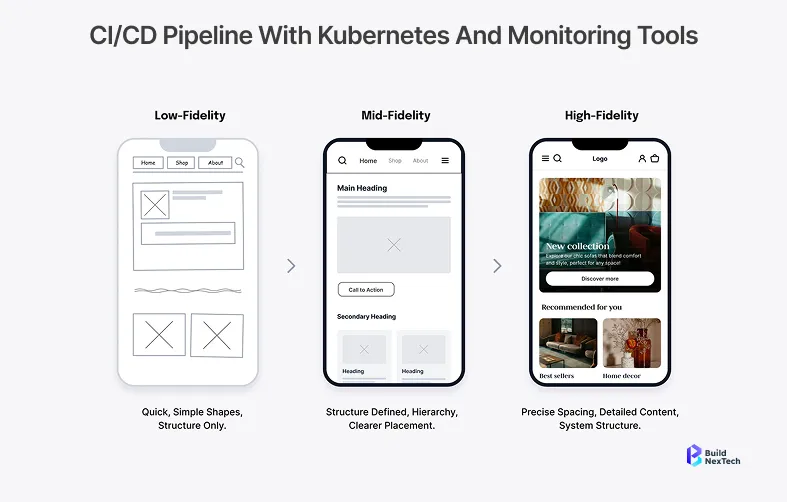
Create Wireframes, User Flows, and Prototypes
Create a user journey map before making any visual design. Determine all the screens, choices, and journeys your users will take. Wireframing and the iterative nature of prototyping are fast and collaborative, like with Figma.
The user flows should have: onboarding, core feature usage, error, and exit. Communicate with stakeholders early catching misaligned expectations at the wireframe stage takes hours to resolve; catching them after development begins costs weeks of rework.
Build Responsive, Accessible UI Components and Design Systems
A design system, prior to the writing of code, helps maintain uniformity across the UI, navigation bars, interactive elements, and forms. Create typography, colour tokens, spacing scale, and your component library in Figma, and then let the developers write one CSS rule.
Accessibility is essential. Create from scratch to be WCAG 2.1 AA compliance semantic HTML, keyboard navigation, support for screen readers, and sufficient color contrast. Costs of retrofitting are much higher than those of initial construction.
Step 4: Bake Security In Not After the Fact
Authentication and Authorization Strategy
Secure and scalable authentication using OAuth 2.0 and JWT (JSON Web Token). Employ multi-factor authentication on access to sensitive user information. Establish permissions for roles before creating any API routes, which will define what can be read and written by which users, and what can be administered by whom.
Short-lived session cookies, correct token expiration, and biometric authentication support (if applicable) are secure session management. An autofill framework and Credential Manager integration should be considered for mobile-adjacent web apps.
Secure Data Storage and Encryption Practices
- Enforce HTTPS with TLS across all endpoints, including browser-to-server communication.
- Use a secret store; never store secrets in source code repositories.
- All data transmitted using TLS encryption; all data stored using AES-256.
- Store sensitive data in internal storage and KeyStore.
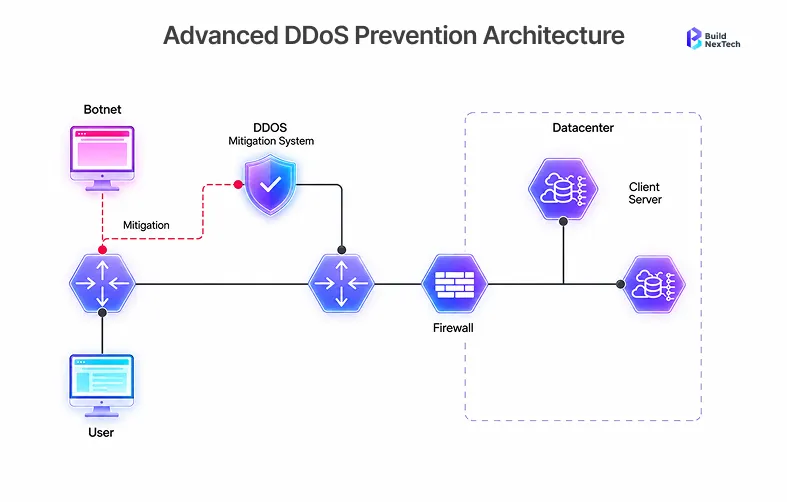
- To prevent abuse and DDoS attacks, all API requests should be limited.
Compliance Checks, Vulnerability Assessment, and Threat Modeling
Do SAST and DAST scans before launch. The most prevalent vulnerabilities of web applications that can be exploited are SQL injection, XSS attacks, broken authentication, and insecure APIs.
Keep SSL/TLS certificates up to date, set up firewalls, and develop a system for security patches to be installed quickly. Under GDPR Article 30, organizations are required to maintain records of data processing activities including what data is collected, how it is used, and how long it is retained before collecting any user data. Non-compliance carries fines of up to 4% of global annual turnover. Penetration testing should take place before go-live, not after.
Step 5: Set Up Your Dev Environment Like You Mean to Ship
Version Control and Git Branching Strategy
Before you begin writing code, write down your branching model. Choose one of the following and explain it: GitFlow, trunk-based development, or feature-branching. Use standardized commit, branch, and pull request messages for all source code repositories.
CI/CD Pipelines and Automation Workflows
CI/CD pipelines must be planned from the start and not after the launch. Run, build, test, and deploy tasks automatically. Add security scans and dependency management checks to the pipeline. AI-powered workflow automation platforms like bnxt.ai help engineering teams orchestrate CI/CD pipeline stages intelligently automatically routing builds, flagging dependency risks, and surfacing pipeline failures before they reach production.
Standardizing Development and Code Review Practices
- Use linting and formatting on the code base.
- Develop coding review checklists and minimums for approval.
- Get the local environment ready to roll in hours, not days, when someone joins the team document it.
- Use AI review tools like Claude Code to get automated code quality feedback.
In bnxt.ai's experience working across multiple web application builds, teams that configure CI/CD pipelines and security gates before writing their first feature consistently ship their first production release 30–40% faster than teams that retrofit pipelines mid-project with significantly fewer rollback events in the first 90 days post-launch.
Step 6: Build a Testing Strategy That Actually Catches What Matters
Unit, Integration, API, and E2E Testing Strategy
Create your own testing pyramid before you begin coding. Tests are deployed in every unit, integration tests check the interaction between different units, API tests check all the response times and contracts of the API, and E2E tests check all the user journeys. In each deployment of a web application test, regression testing should be done.
Test Coverage Goals and Acceptance Criteria
Establish a minimum acceptable level of coverage for each module and the acceptance criteria for each user story before it is developed. Maintain test coverage and test cases throughout sprints in tools like Testomat.io. Defects invariably cost less if they're identified earlier in the development cycle, and shift-left testing does just that.
Performance, Accessibility, and Cross-Browser Testing
The table below maps each testing type to the right tool and what it is designed to catch use it to build your pre-launch testing stack:
Step 7: Plan for Performance and Scale Before the First User Arrives
Define Performance Benchmarks, Core Web Vitals, and Monitoring Goals
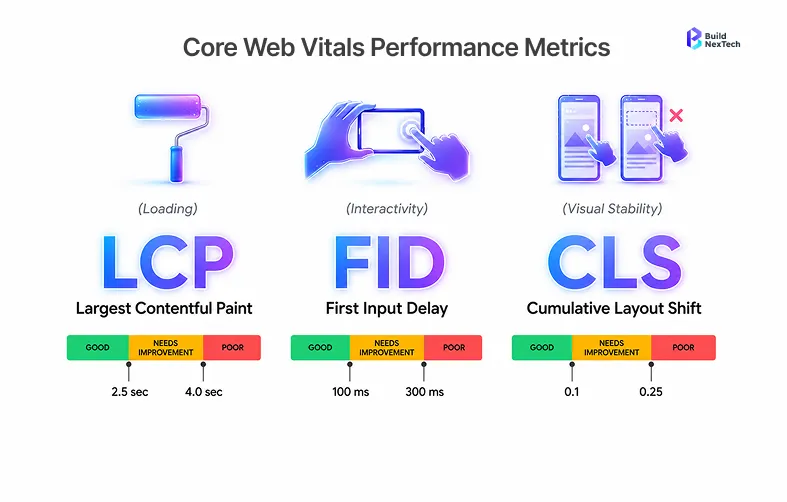
Set LCP, FID, and CLS targets from the beginning of the development process. The Core Web Vitals benchmarks have a direct impact on search results and user retention. Set up monitoring goals to give your team a vision of what "healthy" means when it comes to production.
Caching Strategy, CDN Planning, and Database Query Optimization
Load static resources from the first day with CDN. Don't put caching layers as an afterthought because you're getting complaints from your customers about slow performance; put them in your architecture.
Step 8: Get Launch-Ready Infrastructure, Staging, and Rollback
Pre-Launch Infrastructure Checklist
- The SSL/TLS Certificate will be automatically renewed and set up.
- Custom domains pointed and propagated.
- Redirected and canonical URLs checked.
- Confirm staging and sandbox environments are fully isolated from production data and configuration.
- Protection against DDoS attacks and firewalls are in place.
Staging Validation, Monitoring Setup, and Logging Configuration
Operate a complete staging environment, identical to the production environment. Sign off on UAT with actual stakeholders before go-live. Configure logging, alerting, and uptime monitoring before going to production.
Rollback Plan, Disaster Recovery, and Incident Response Strategy
For each launch, a rollback plan is required. Set up a trigger, rollback procedure, and team members responsible. Make sure that your team can respond to an incident in production within minutes by documenting your workflow.
Step 9: Plan for What Happens After You Go Live
Bug Tracking, Hotfix Management, and Patch Release Workflow
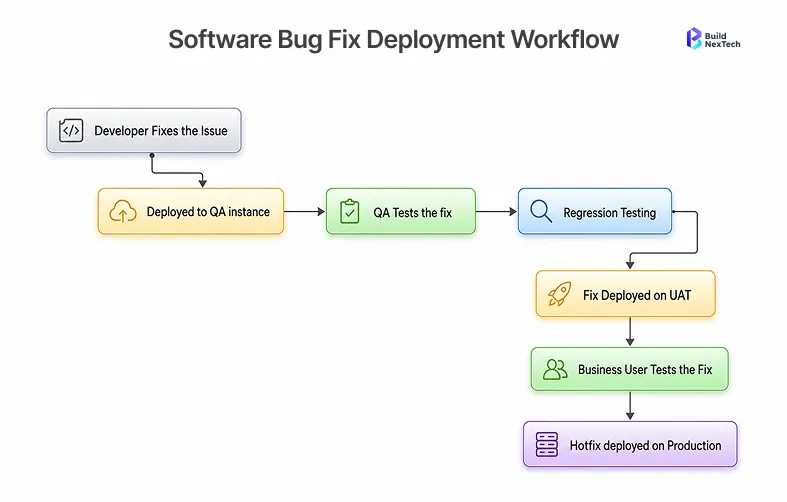
Have an established bug triage process in place before launch. Establish severity levels, response SLAs, and your hotfix deployment process. Embed issue tracking into your Kanban board and pipeline to get bugs from report to fix to deployment without manual handoffs.
Analytics, User Feedback Loops, and Performance Monitoring
Integrate Google Analytics and track performance from the get-go. Identify the feedback mechanisms you'll use to inform your roadmap in-app surveys, session recordings, and support tickets. Post-launch data can be analyzed at scale using platforms like bnxt.ai, which automates feedback aggregation, surfaces usage patterns, and triggers workflow actions based on real user behavior turning raw analytics into prioritized product decisions. Post-launch data is only valuable if you have the systems in place to capture, analyze, and act on it without those systems, even the best data goes to waste.
Conclusion: Your Checklist Is Ready Now Go Build Something Great
The best teams to ship fantastic web apps aren't the ones who write code fast. It is they who plan the most carefully. Each step from locking down the scope to setting rollback plans takes an hour of planning, which saves days of debugging.
Before you write one line of code, use this checklist. Share with your stakeholders. If you are already working on a project, run it against your project. AI-native development platforms like bnxt.ai which combines workflow automation, pipeline orchestration, and post-launch monitoring in one layer are helping engineering teams consistently deliver faster and with fewer post-launch failures. Pre-build is not overhead; it's the advantage.
People Also Ask

Q1. REST API vs GraphQL: which should you choose and when?
REST APIs suit most standard web applications they are well-understood, widely supported, and simpler to cache. GraphQL excels when clients need flexible, nested data queries, and you want to reduce API requests by fetching exactly what you need. For most early-stage web apps, REST is the lower-risk starting point. Migrate to GraphQL when over-fetching or under-fetching becomes a real performance problem.
Q2. How does server-side rendering (SSR) compare with client-side rendering (CSR)?
Server-side rendering (SSR) is the stronger default when search visibility and Core Web Vitals are priorities it delivers faster initial load times and better SEO by rendering pages on the server before delivery. Client-side rendering (CSR) suits applications where rich interactivity matters more than first-paint speed, at the cost of slower initial load. Frameworks like Next.js support both strategies per-route, letting teams apply the right approach to each page rather than committing to one model across the entire application.
Q3. How does lazy loading improve frontend performance optimization?
Lazy loading improves frontend performance by deferring the loading of off-screen images, components, and assets until the user actually needs them directly reducing initial page weight and shortening time-to-interactive. The result is measurably better Google PageSpeed scores and faster perceived load times for users. Implement it natively using the loading="lazy" attribute for images and dynamic imports for JavaScript modules both require minimal code changes for significant performance gains.
Q4. How do OAuth 2.0 and JWT improve authentication and authorization workflows?
OAuth 2.0 improves authentication workflows by providing a secure, standardized framework for delegated authorization allowing users to grant third-party access without ever exposing their credentials. JWT tokens complement this by carrying encoded user identity and permission claims, enabling stateless authentication across distributed services without server-side session storage. Together, OAuth 2.0 and JWT eliminate the overhead of session cookies on every request, support multi-factor authentication, and make role-based permission models straightforward to implement and scale.
Q5. What role do service workers play in Progressive Web Applications (PWAs)?
Service workers are the foundational building block of Progressive Web Applications background scripts that sit between the web application and the network, intercepting requests to enable offline functionality, push notifications, and intelligent asset caching. For applications targeting users on unreliable connections, service workers serve cached content seamlessly when connectivity drops, delivering an app-like experience without requiring an App Store submission. Any web app aiming for PWA status should treat service worker implementation as a core architectural decision, not an add-on.


.webp)
.webp)
.webp)